

Volume 15 - Spring 2003
Tree Marbling - Challenges and Secrets
by Richard Smart
Tree marbling was made popular during the early 1800s, with the earliest known tree binding dating back to 1775. The large bookbinding companies such as W.T. Morrell & Sons and Zaehnsdorf, produced tree calf bindings, with W. T. Morrell's still commercially undertaking these commissions up until the 1970s.
For several reasons, today's binders do not have the opportunities to learn the skills required to undertake calf marbling and decoration. Formerly, these skills would have been learnt within an apprenticeship scheme surrounded by those with years of knowledge and skills. Nowadays, there is also limited access to multiple-volume sets of books that require binding in tree calf. The large scale binding in itself would have created a good background for a high standard of tree calf work and the ability for one person to be repetitive with their tree design on multi-volume sets.
These companies also had the opportunity to experiment with different recipes for producing tree patterns with different shades and colours, such as green tree calf. Marbling and stippling effects simulating different types of wood were also produced.
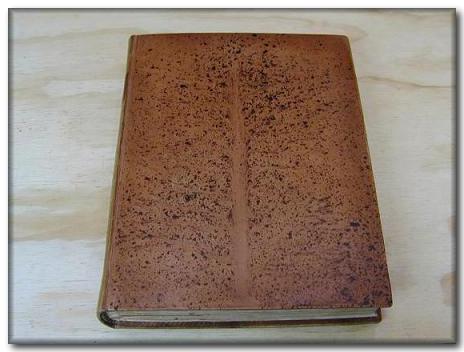
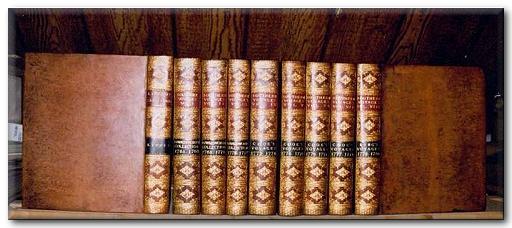 A
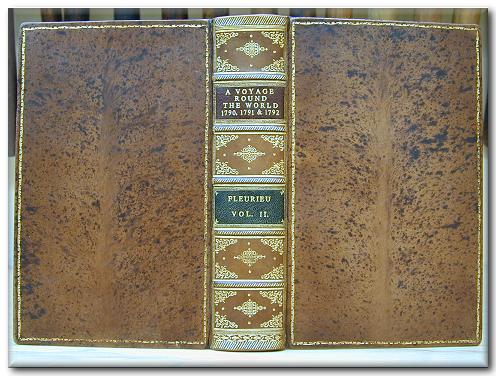
set of Cook's Voyages Vols. 1-8 were re-backed. The first in line, Life of Captain
Cook was bound in full tree calf to match the rest of the set.
A
set of Cook's Voyages Vols. 1-8 were re-backed. The first in line, Life of Captain
Cook was bound in full tree calf to match the rest of the set.
My Experiences
Once I had decided that I wanted to do tree calf binding, I began to examine books with the tree pattern, and tried to establish for myself how the effect could have been achieved. I knew that the application of water over the boards with a stain created the patterns, and my first thought was that the water was forced to run from the centre out. So I began my search for information on how to do tree marbling. I started looking through bookbinding books for references on the subject. Although there were several references to the process they were varied and sketchy and just skimmed the surface of describing the complete process.
I collated all the information I had to hand and incorporated my own ideas. After many hours of trial and error, I did begin to make small but significant progress. I was learning that like good, gold tooling the whole process is as much about feeling and experience as it is about getting the recipes right and the processes in the correct order.
The Challenges
There are many determining factors that can make tree-calfing a success or failure.
To create the pattern in
the desired form, the boards have to be shaped and curled out and away from
the book. The book is set at an angle to get the water to run down the boards
and in to their centres in order to form the tree trunk shape. The surface of
the leather also has to allow the liquids to run across it without soaking in
too fast (if at all). The biggest problem I encountered is that the water creating
the desired pattern needs to be sufficient to run down the boards carrying the
stain in to the desired pattern. But the water also needs to run for long enough
to allow the stain to take effect in one go without mixing too much with the
water, causing the areas that should stay light in colour e.g. the trunk, to
turn black or dark grey. 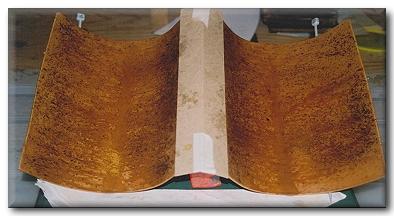
At this
point the water has created the required tree pattern
and the Ferrous Sulphate is developing in to the pattern
Another potential problem is over sprinkling. Once the recipe has been sprinkled on to the boards you need the confidence to stop it at the right point and to allow the pattern to develop, as it takes a few seconds for the pattern to show. Once the pattern has appeared and is a shade you are satisfied with, the boards need to be washed off. I found that carefully washing with clean tap water via a hose worked well. Washing with a sponge is an alternative method, but I soon realised that in some circumstances where some of the stain that had not taken properly or was still 'sitting' on the surface, smearing would occur leaving grey streaks. By washing with a hose I found that I could stop the pattern from getting any darker as it dilutes and washes off the stain very quickly, giving control over the density of the pattern.
The Whole Process
The book is bound using a thin board, e.g. 1.5mm making sure that when you cover the book you allow enough room in the joints for the fill-in board. To achieve this I cut the fill-in board at the same time as the thinner board. I back cornered both boards and set the boards as if being bound together. Then before turning-in I remove the fill-in boards. I keep in mind when I turn-in that the turn-ins need to be lifted again to insert the fill-in boards. Once the book has been turned-in I replace the fill-in boards with stretchers in the joints to make sure that I am not short on joint space when it comes to the binding process.
Once bound and dry, give the cover a heavy but wet paste wash and allow to dry. Once dry, sponge the book with Potassium Carbonate (7 coats are recommended) or until the leather is thoroughly soaked and has started to brown slightly.
 Curling
the Boards
Curling
the Boards
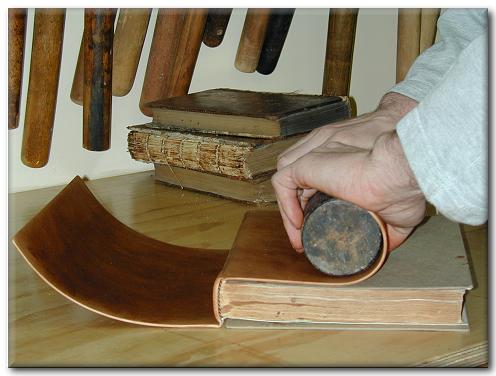
At this point the boards should be soaked and supple enough to be curled to the desired shape, This is done by using a tree calf roller. A wooden roller with a diameter of about 75-100mm (3 to 4 inches) is used. Place the book so the one board is open flat on the bench cover side up. The roller is then placed on the board parallel to the spine. As the roller is rotated towards the spine with the wrists, pull the board up and around the roller with the thumbs. Both boards should be curved outward from the book. Allow the boards to dry in this curved shape.
The boards are then sponged with glaire. Give two coats making sure the glaire is even and doesn't froth or streak, taking care not to glaire the turn-ins or spine. Allow to dry. You will need to mask-off the spine by making a cover with folded greyboard, or decorator's masking tape that will peel off the spine without marking it.
The book then gets suspended on rods over a tray at an angle which will depend on the pattern you require. Ensure that the pre-mixed ferrous sulphate is to hand, together with a supply of clean water.
Charge your brush with the ferrous sulphate in preparation for sprinkling and then sprinkle the water on the board creating rivulets. These often flow to the centre of the board, so use a finger to guide the water. The pattern create at this point with the water will reflect the overall finished pattern. The water has to run across the board and down the centre without soaking in, so speed and confidence is important at this point. Whilst the water is still running sprinkle on the ferrous sulphate solution.
 Adjusting
the distance you sprinkle from can also change the pattern created by the process.
If you stand further away from the book the droplets will be smaller resulting
in a finer pattern.
Adjusting
the distance you sprinkle from can also change the pattern created by the process.
If you stand further away from the book the droplets will be smaller resulting
in a finer pattern.
Once the pattern has appeared, wash off with clean water. This will prevent the pattern from becoming too dark. This process washes off the excess ferrous sulphate preventing it from mixing with the water and turning everything grey or black as the water soaks in to the leather.
Allow the boards to stand for a few minuets after washing. This allows the pattern to strike and all surface water to disappear. At this point the boards should be supple again, enough to bring the boards back round by shaping them gently by hand. Stand with the boards spread apart and allow to dry.
The turn-ins can now be lifted and the fill-in boards glued in place. Prior to tooling, the binding may (if required) be wiped over with Potassium Carbonate. This will turn any of the pattern that has gone too dark or black to a soft brown.
Once the bindings were completed the marbled calf covers were often finished with a polishing coat of oil or varnish. As far as I have been able to ascertain, bindings with tree calf designs shouldn't have gold tooling on the boards, apart from the edges. It was said that the calf marbling was all the decoration that was needed. However, binders did often use a gold pattern or lines around the board because it helped to frame the tree pattern and make the pattern standout more.
 Equipment
and Materials for Calf Marbling
Equipment
and Materials for Calf Marbling
- Paste wash solution - two coats with sponge or cotton wool, avoid streaking.
- Hydrated Potassium Carbonate. (Salts of Tartar) - A solution of two rounded teaspoons in a 1lb jar of water.
- Ferrous Sulphate Solution (Copperas) - Three rounded teaspoons in 3 pints of water.
- Water, preferably soft. For sprinkling and washing.
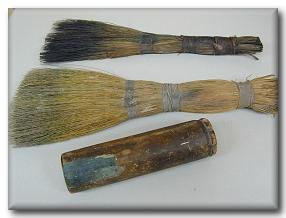
- Large Brushes. These were often made from bunches of leafless Birch twigs held together by metal bindings.
- Marbling Rods - for supporting the book at desired angle over the tray.
- Wooden Roller - about 14" long and 3" - 4" diameter.
Richard Smart - Richard has over ten years experience working along side his father John in England. He has developed skills in the restoration and conservation of paper and documents and the undertaking of new & fine bindings. Richard now lives in Vancouver, Canada where he runs his own business, The Old English Bindery.
Skin Deep - Volume 15 - Spring 2003
Download Skin Deep - Volume 15 in PDF Format