

Volume 15 - Spring 2003
A Joint Venture
by Arthur W. Johnson
Every operation in binding should contribute to the durability of the book. This is an examination of the joint constructions that are crucial to the strength of hinges and movements of the boards.
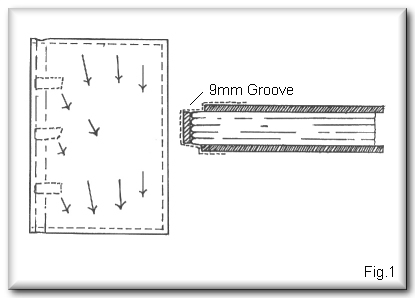 |
Flat Back Case Binding - figure 1 This is a simple construction and an example of bookcraft work rather than a binding. It is acceptable for books of little worth but can be attractive if covered in quarter leather or cloth with decorated paper sides. The spine strip of board is equal to the width of the sewn sections, or, if preferred, the width plus the thickness of the two boards. The standard measurement of the groove is 9mm, but may be reduced slightly if the result is a loose joint. Suspended between the boards the sections have a greater gravitational pull further away from the tapes. This strain will cause the stitching, tapes and linings to fail and the tail foredge to scuff on the shelf. |
|
Case Binding - figure 2 A cased book made by hand imitates a machine product. From the middle of the nineteenth century the invention of printing and bindery machinery supplied the market with economical and serviceable books. The sections were assembled mechanically by means of thread, tape, linings and adhesives. These text blocks were fixed between boards, joined together by cloth. Cloth that folds into a sharp crease will break down, therefore and extra measure at the hinge is necessary for free opening. This is accomplished by making the depth of the joint one and a half times the board thickness. This depth can be increased for large books with thick boards and when using coarse cloth. |
 |
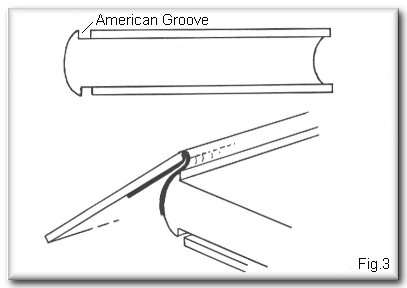 |
The American Groove - figure 3 This is an adaptation of the case binding and has similar appearance to that of the Library Style. Boards are positioned 3mm from the joint in order that unusually thick material, such as Hessian, will fold back freely. The disadvantages are that the spine is unsupported by the joint and the boards tend to be loose. Although it is a case binding, the measure of the joint and the board thickness are the same. |
|
Account Book - figure 4 Account books are the most durable of binding but are rare today because of machine accounting, the lack of skills and the cost of making. The leaves open flat for entries by hand, therefore the book is rounded only. The involved operations include guarding each section with cloth, intricate sewing on webbing, tacketing, endpapers reinforced with buckram, a spring hollow, laminated boards, leather linings, brass shoes and locks. Costs depend on the quality of craftsmanship involved, as expensive work is bound in either vellum or double layers of morocco. The cheaper ranges are covered in calf, basil (sheepskin) or buckram. |
 |
 |
The Library Style - figure 5 At the beginning of the 20th Century a robust book construction without refinements was required for lending libraries. The style is a great contribution to the purpose of bookbinding. Based on the account book, its attributes are endpapers reinforced with cloth, overcast sections, tape sewing, split boards, the french groove, inserted cord headcaps, unpared morocco leather, tight smooth back and the universal corner. A minor weakness lies in the boards being set away from the joint. Thus the text block is not supported by the board edges, but leans against a cushion of leather. The style may be covered in buckram or vellum and as these materials are unsuited to a tight back, a hollow back is incorporated. |
|
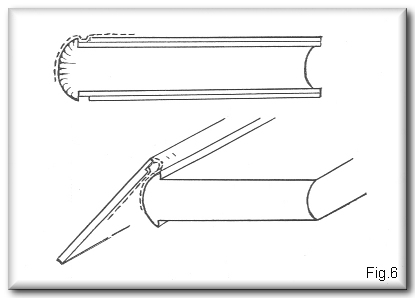
Harrison Groove - figure 6 Named after its innovator, it is also referred to as the semi-french or supported groove. Library binders were concerned over the problem of the spine unsupported by its boards. Harrison resolved this with a simple solution by increasing the thickness of the inner boards of the split and placing it flush with the joint. Thus the text block is supported whilst the reduced thickness of the outer board retains a shallow groove necessary for the unpared leather. The boards open extremely well. |
 |
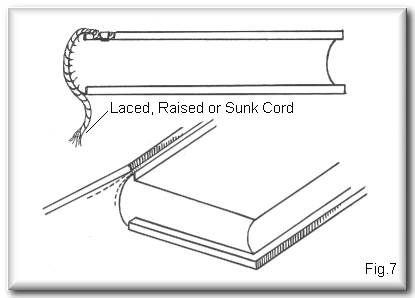 |
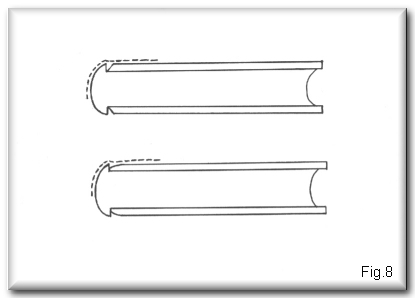
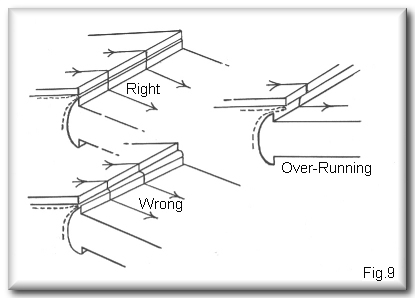
Flexible and Sunk Cord Styles - figure 7 Since early times, this construction has the boards placed flush against the shoulders of the spine and a depth of joint equal to the board thickness. Thus the text block is supported and the strain of sewing is relieved. The durability of the style depends on a high level of craftsmanship and the employment of good materials. The drawback is that the leather has to be thinned at the board hinges in order for the book to open freely. Strength can be maintained by paring no more than necessary and using durable leather. Modifications for the use of thicker leather have been attempted but have not been entirely satisfactory. see - figure 8. A common error when covering the flush joint style is not 'setting' the joint efficiently. When the boards are covered and the turn-ins completed, but before tying up, the procedure is to open one board. Press it down along the spine edge and manipulate the board until it sits close and at right angles to the joint. Close the board and repeat the operation on the other side. Open the first board again and if it has moved out of position, press down again but over run the joint by a fraction. Close the board setting it firmly into the shoulders of the spine. Check the other board and finish covering. Refer to figure 9 |
 |
 |
|
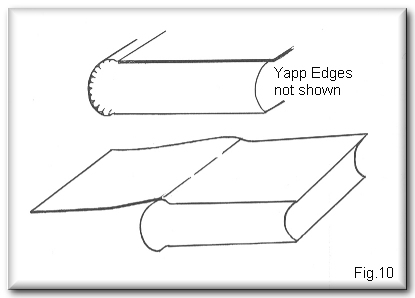
Pin Head Joints - figure 10 A pin head joint is an apt description of the position of boards on limp bindings such as bibles and hymnals. Thin boards, such as manila, are placed 2mm from the spine edge. Sections are sewn with an excess swell in order that they maintain a rounded shape. They are not backed. Sections may be french sewn but the use of tape is preferable for strength. The spine should be flexible and this is achieved by one lining of archival cloth, or better, a strip of leather sand-papered smooth. The usual covering is thinned morocco with a tight back. The boards do not fall back easily unless the leather is thinned sufficiently |
 |
|
Endpapers and Joints The case of a flat backed book is positioned on the bench with the front board to the left. Place a waste sheet under the back board paper and paste the endpaper until the paper is relaxed. Remove the waste, turn the text block over and position it on the back board paying careful attention to the squares. Without delay or examination paste the front board similarly. Remove the waste. The whole of the text block including the back board is turned onto the front cover carefully aligning the boards one above the other. Nip in the press for ten seconds with the pressing boards almost up to the spine strip. The foredge of the board paper will stretch when pasted and the squares will be uneven. Therefore an estimated amount is trimmed off prior to pasting or alternatively the extra may be removed when the paper is down and still wet. The case of a rounded and backed case binding is placed flat on the bench with the front board to the left. Place a waste sheet under the back board paper and paste this until the paper is relaxed. Remove the waste, turn the text block over and hook its shoulder against the inner edge of the back board. Without a pause, paste the front endpaper in a similar way. Remove the waste. Lift the front board and hook it into and against the inner edge of the front joint Check the squares are equal. Do not open the book until it has been nipped in the press for ten seconds. The pressing boards are positioned up to the joint. Refer to previous instructions on paper stretch. Putting down the endpapers of the library style is an easy procedure. Place a waste sheet beneath the board paper and paste this until the paper is relaxed. Remove the waste and close the board. Working quickly, repeat the operation on the other side. Nip in the press for a few seconds with the pressing boards up to the french groove. Remove and examine before leaving the book in the press to dry. The curve of the covering material in the groove tucks the paper neatly into the joint. Refer to previous comments on paper stretch. Endpapers reinforced with cloth are usually lined or 'stiffened', therefore it is advisable to use thin glue as the adhesive. Books bound using the Harrison groove are in fact flush jointed and endpapers are treated as described below. Putting down the endpapers of flush jointed books is problematic for factors such as sheet size, qualities of paper, thickness of adhesives, humidity, forwarding procedures and efficiency of working may affect the result. Place the book on the bench with the foredge of the open board resting on the surface. This positioned is maintained until the board paper is dry. Hold and pull the board paper close to the foredge and let it slip as the dry paper is modelled into the joint. Mark off the required trim for the margins with dividers. Place a piece of card underneath and cut to remove the excess. When pasted the head and tail margins will be constant because of the grain direction but the foredge will stretch. An estimated extra trim will be necessary. Put a waste sheet under the board paper and paste this until the paper is relaxed. Do not alter the position of the board but ease the pasted sheet lightly onto the cover. Place a strip of waste paper over the joint and through this form the paper to the contour of the joint with thumb and finger. When the paper is firmly in place and the joint clearly defined rub the rest of the board paper firmly on to the board working from the inner to the outer edges. Always rub down under white waste. Do not over paste as an uneven surface will result. This procedure is known as 'pasting down open'. Perfect margins are achieved if the board paper is first put down and trimmed whilst wet. Paste the board paper as described and firm it into the joint but rub the remainder lightly onto the board. Quickly mark the required margins with dividers and use a metal ruler and a new scalpel blade to trim the wet paper. Peel away the excess and complete the rubbing down particularly into the joint. In twenty minutes, depending on humidity, half close the board so that it rests on a ball of wastepaper. Leave for a further ten minutes before closing fully. Limp binding endpapers are 'put down shut' similarly to cased and library work. Place a waste sheet under the board paper and paste this. Remove the waste and close down the cover pushing it into the joint. Immediately treat the other side in the same way before nipping the binding in the press. The pressing boards are placed just short of the joint. The excessively rounded spine may prevent an all over pressure therefore the work is examined after five seconds when it can be adjusted. |
|
Arthur W. Johnson A.T.D., N.D.D. - Arthur was born in 1920. As well as holding an Art Teacher's Diploma and a National Diploma in Design he is also an Honary Fellow of both the Institute of Craft Education and Designer Bookbinders. Arthur has held teaching posts at Hornsey College of Art, Hammersmith School of Art, Willesden College of Art and the London College of Printing. He retired from teaching several years ago. He has also lectured extensively in England, Canada and New Zealand. His work has included Calligraphy, Fine Binding and Antiquarian Book Restoration and his bindings can be found in many public and private collections, including the British Museum. His excellent book, the Manual of Bookbinding by Thames & Hudson is considered as one of the foremost reference works for bookbinders and is recommended as essential reading by many teachers of bookbinding. He has written two other books that were also published by Thames & Hudson, A Practical Guide to Bookbinding and Book Repair and Conservation and Lettering on Books, published by Puiri Press, New Zealand.
Skin Deep - Volume 15 - Spring 2003
Download Skin Deep - Volume 15 in PDF Format