

Volume 17 - Spring 2004
Preparation of a Book for Binding
by Arthur W. Johnson
Introduction
Books are a valued commodity to the bookseller, a source of knowledge to the scholar and precious acquisitions to the collector. Binders are responsible for the books in their care, therefore it is wise to insure against loss or mishap. First editions are valuable in their original covers whatever their condition and antiquarian books are bound in sympathy with their period. However if a more durable or practical binding is required, a modern construction is preferable. Work is discussed with the owner to determine the binding and covering styles, preference for colour and the quality of materials. Books are examined for damage or defects and these noted to avoid later misunderstanding. An order form is completed with the work details and such information as the correct title and whether it should read up or down or across the spine. Costs are high and it is better to state a price rather than estimate for the work. The rule is never to do more than is requested. A signature should be given for a valuable book. These initial arrangements promote confidence and reliance on the binder's ability. The 'history' of the binding consists of title labels, end papers, ex-libris and dealers' stickers, signatures and notations, inserts, registers and page markers; all of these should be retained and included in the rebinding if required by the owner.
Checking And Collating
No book is 'pulled' until it has been examined for defects. Tears, missing leaves, acidic tissues, loose plates, amateur repairs, stains, wormholes, fungal spores, unusual section arrangements and similar problems are reported to the client for comment. The bookseller records every leaf of a valuable book therefore no part is discarded. The rule does not apply to endpapers for they are of the binding and not the text.
Some early books had signatures or numbering out of sequence, missing or repeated although the book was complete. These errors occurred when more than one printer was involved in production. An aid for checking the sections is the catch word that is printed at the foot of a page and is repeated as the first word of the next page.
The letters of the alphabet, except for J and Q, are used for the sequence of the sections and are called 'signatures'. These are printed at the bottom of the first page of each gathering. Should there be more than twenty-four sections, these are signatured AA or BB and so on. The first section of a book is the 'preliminary' matter made up of the title page, contents, etc. and is rarely signatured. These pages may be numbered with Roman numerals. Page 1 begins the second section and is signatured B.
Mass machine printed books are not always signatured but the pages are numbered. These sections must be kept in order when separated. Fortunately each gathering will have a black line printed on the fold in a 'step' formation making it simple to see if a section is misplaced or missing.
Pulling
The sections are separated with care in order to minimize damage. Slice down the hinges through tape, cord, and linings with a knife and remove the covers. Hollow backed books are simple to pull but the spines of tight backed leather volumes are first coated with a thick layer of paste. The leather is softened by the moisture in five minutes and removed by scraping with the back of a knife. The process may have to be repeated in order to clean the spine thoroughly. Titling labels, that are to be preserved, are carefully peeled off before scraping. The numbers of leaves to a section vary according to the paper thickness and quality of publication. Most books have sixteen pages (eight leaves) to the section. Fewer have twenty-four or thirty-two pages. Variations occur when illustrations or insets are included. Plates may be single sheets tipped in at their place of reference, others could be double leaves distributed within the sections. Books on art invariably have complete sections of illustrations either spaced within the book or as a group at the back of the volume.
The endpaper flyleaves are eased away.
 The
first section will have a ridge of dry adhesive and old linings along the
spine. This is broken away with the thumb or back of a knife. The first section
consists of 'prelims' and may not be uniform with the remaining sections.
Omitting the frontispiece plate, if present, count the number of leaves until
the stitching is revealed. Cut the stitches carefully, for machine-sewn books
have double threads. Count the same number of leaves to the end of the section.
Check that the signature B is on the next page before pulling away the whole
section in a parallel direction. With the section free run thumb and finger
down the outside fold to remove nubs of glue and check the centre for debris
and loose threads. Again break away the hard ridge of B section and count
to the stitching. This should establish the make up of the sections and after
cutting the threads the leaves are counted until the next signature C is visible.
It is expedient to check also the numbering and if applicable the catch word
before pulling. This procedure is similar for all sections. Sections of leather
bound books are separated when the spine is dry. Keep the sections in order.
The
first section will have a ridge of dry adhesive and old linings along the
spine. This is broken away with the thumb or back of a knife. The first section
consists of 'prelims' and may not be uniform with the remaining sections.
Omitting the frontispiece plate, if present, count the number of leaves until
the stitching is revealed. Cut the stitches carefully, for machine-sewn books
have double threads. Count the same number of leaves to the end of the section.
Check that the signature B is on the next page before pulling away the whole
section in a parallel direction. With the section free run thumb and finger
down the outside fold to remove nubs of glue and check the centre for debris
and loose threads. Again break away the hard ridge of B section and count
to the stitching. This should establish the make up of the sections and after
cutting the threads the leaves are counted until the next signature C is visible.
It is expedient to check also the numbering and if applicable the catch word
before pulling. This procedure is similar for all sections. Sections of leather
bound books are separated when the spine is dry. Keep the sections in order.
Knocking Out the Original Groove
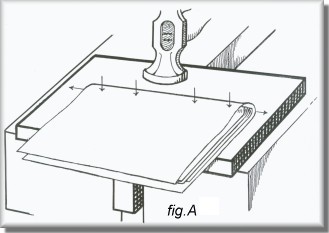
The folds of the separated sections are distorted by the previous backing and these are flattened in order for work to proceed. Fix a knocking down iron to the end of a laying press, clean the face of a backing hammer and fold a sheet of strong paper cut to the length of the section.
 The
number of sections that can be flattened at one time depends on the thickness
and quality of the paper. Generally three or four are put within the fold
of the paper, placed on the iron and are hammered along the original groove.
To avoid cutting the paper by misalignment on the edge of the iron it is preferable
to bounce the hammer in the centre of the iron and move the sections from
side to side. See fig.A
The
number of sections that can be flattened at one time depends on the thickness
and quality of the paper. Generally three or four are put within the fold
of the paper, placed on the iron and are hammered along the original groove.
To avoid cutting the paper by misalignment on the edge of the iron it is preferable
to bounce the hammer in the centre of the iron and move the sections from
side to side. See fig.A
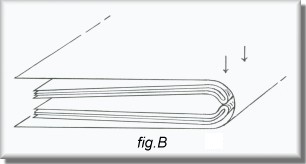
It may be necessary to hammer the grooves twice in order to flatten them. When knocking out sections of hand made paper or similar, it will assist if two sections are counter positioned together after knocking them up to the foredges. See fig.B
Violent blows will damage and reduce the thickness of paper. Remaining signs of the old groove will disappear after pressing.
 Repair
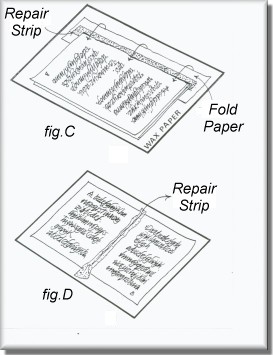
Extensive repairs to sections result in an uncontrollable swell, therefore guarding is contained to the essential. Swell can be reduced by thin repair paper, reduction by hammering, sewing 'two or three up' or by using a thinner thread and packing the sections when backing. These methods can be detrimental to the strength of the binding. The grain direction of text and repair paper must be the same. Repair guards should have strength without too much substance. All repairs are done with paste as it is colourless, flexible and has a stronger bond. Economical work is guarded with bank or bond paper and the strips may be cut, torn or scored with a needle before separation. They can be reasonably wide and this width can vary in order that the swell is not concentrated in one place. Their length is 25mm longer than the section for convenient handling. A complete section is guarded round the outer fold if necessary. Should inner folds need repair the outer double fold is removed in order to continue. See fig.C
Well used books may have the entire lower parts of the folds damaged. The solution is either to repair the inner and outer folds or raise the position of the kettle stitch to the sound paper. Rare and antiquarian books are treated sympathetically and the repair paper is selected to be strong and to tone in with the text paper. Strips are torn by hand or 'needled' 3mm wider either side of the damage. The four page folds are laid flat and the repair paper is pasted and modelled down with a folder on the outsides. See fig.D. After repair the sheets are assembled and folded as sections.
Sections of stout paper are repaired with thin handmade paper or archival linen. Guard the first section on the outside fold whilst the next is repaired on the inside of the outer fold, as linen does not readily adhere to linen.
Vellum sections are guarded with sausage skin membrane or hand made paper.
General Paper Repairs
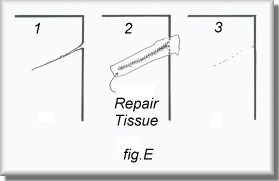 The
range of toned repair paper should be reasonably strong and also as translucent
as possible. Check the grain. A simple tear is painted with paste for 3mm
all round. The edges are wedded together and a larger piece of matching tissue
is bonded down with a folder. Both sides are done and when dry the excess
tissue is rubbed and trimmed away. See figs. E1, E2 and E
The
range of toned repair paper should be reasonably strong and also as translucent
as possible. Check the grain. A simple tear is painted with paste for 3mm
all round. The edges are wedded together and a larger piece of matching tissue
is bonded down with a folder. Both sides are done and when dry the excess
tissue is rubbed and trimmed away. See figs. E1, E2 and E
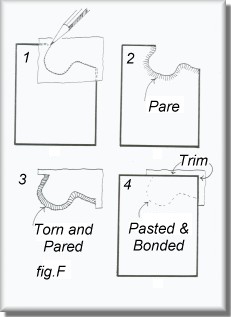
The missing area of a leaf is replaced and there are two methods. Method 1 - see figs. F1, F2, F3 and F4
- Draw the profile of the missing piece on matching paper.
- Tear this larger by 3mm. Pare both edges.
- Paste both edges and marry them together using a bone folder. Trim the excess. If necessary the torn part can be reinforced with repair tissue. The loss of print is inevitable and should be kept to a minimum.
- Do not replace text by hand unless requested.
 Method
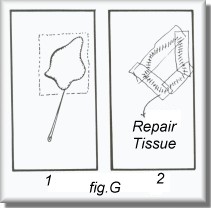
2 - see figs.G1 and G2 With this method, the loss of text is less.
Method
2 - see figs.G1 and G2 With this method, the loss of text is less.
- Place matching paper under the missing part and scratch the outline with a needle point. Gently tear away the excess.
- Manipulate the piece to fit, paste the edges for 3mm and bond together with tissue as described above. Both sides are done and excess tissue rubbed off.
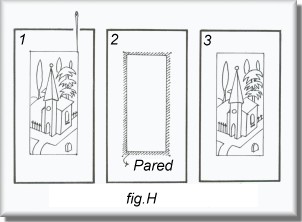
Plates which are smaller than the book page size may be mounted on sheets of similar format. See figs. H1,H2 and H3
- Cut the required sheet and position the plate. Mark each corner with a needle point
- Cut out the panel 3mm smaller all round and pare the edge. The plate can also be pared on the back if needed.
- Paste the pared edges and lay the plate into position and bond down with a folder.
 |
 |
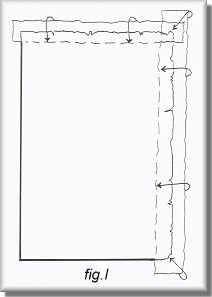 Damaged
edges of sheets are strengthened with torn lengths of repair tissue with the
correct grain direction. If the tissue is too thin to paste, adhesive is brushed
on the leaf. Tissue is cut longer (or wider) and twice the width required. Place
the tissue on the pasted area for half the distance, nib down, turn the leaf
over, paste and fold the tissue onto the reverse side. Excess tissue, at top
and bottom is used to reinforce and replace damaged corners. See fig.I
Damaged
edges of sheets are strengthened with torn lengths of repair tissue with the
correct grain direction. If the tissue is too thin to paste, adhesive is brushed
on the leaf. Tissue is cut longer (or wider) and twice the width required. Place
the tissue on the pasted area for half the distance, nib down, turn the leaf
over, paste and fold the tissue onto the reverse side. Excess tissue, at top
and bottom is used to reinforce and replace damaged corners. See fig.I
Other repairs and treatments
Dampen the edges of dog-ears and flatten them, but if they are weak reinforce with matching tissue.
Transparent heat set and pressure sensitive archival tape are ideal for minor tears and strengthening. These are less noticeable if torn small.
A soft eraser moves dirt more efficiently than powdered rubber. The eraser is worked towards the centre of the page as if edges are caught they will tear or crease.
Single plates that were originally tipped in are guarded around the fold nearest their point of reference.
Sheets of tissue facing illustrations were placed there should the ink offset. Invariably they will be creased or stained and are best replaced with neutral new tissue.
Grease marks are removed by painting them with carbon tetrachloride. Work in the open air as the chemical is carcinogenic.
Worm holes are filled with a mixture of paper scrapings and paste. Press this into the holes with the point of a needle working on waxed paper and a hard surface. When dry reduce the bumps with a scalpel.
The usual adhesives will not work on plastic surfaced paper. With care the laminate only is cut 5mm from the back edge of the paper and stripped off. It may be then guarded round a section.
The removal of Sellotape and similar products is problematic. Recently applied tape should be lifted at a corner and touched with a solvent such as lighter fuel. The liquid runs under the tape and the backing lifts but a sticky medium remains. Dissolve this with frequent applications of solvent, it should not be allowed to dry until clean. The backing of old tape is easily lifted but it leaves a hard ridge of brown medium which is impervious to solvents. This can be reduced by scraping with a scalpel or it can be disguised by a layer of repair tissue. Powerful solvents will destroy the cellulose of the paper and dissolve printing ink, therefore the removal of tape depends on the quality of paper and print. Pulling off tape will lift the surface of the paper, and rather than this, it is wise to let it remain.
A few fox marks may be ignored for it is more harmful to the paper to remove them. However sheets can be soaked in a weak solution of Chloramine T, well washed in running water and the paper resized.
Water stains are the result of moisture spreading the paper size but soaking the leaf will extend the stain off the paper. It is essential to resize.
Fungus spores are present in many old books. Some are hardly detectable but others appear as foliated growths coloured generally brown, grey or green. Moisture reactivates the spores. A soft brush will remove dry surface growths but the paper should be soaked in a solution of 2Ogms Thymol in 1 litre of industrial methylated spirits for fifteen minutes and washed for one hour and resized. It is essential to wear a face mask to avoid respiratory problems.
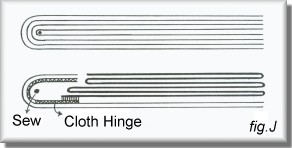 Folding
maps or diagrams tipped in the book (insets) are removed and repaired. They
are not pressed with the text otherwise adjacent sections will be indented but
are refolded and nipped. Make up the map with stubs of paper to the thickness
of the section and hinge this with a thin linen guard and sew as an extra section.
See fig.J
Folding
maps or diagrams tipped in the book (insets) are removed and repaired. They
are not pressed with the text otherwise adjacent sections will be indented but
are refolded and nipped. Make up the map with stubs of paper to the thickness
of the section and hinge this with a thin linen guard and sew as an extra section.
See fig.J
Loose maps or other matter (inserts) are folded and placed in a paper or cloth wallet. This is attached to a stub and sewn as above.
Should it be necessary to replace missing pages, facsimiles can be produced. From another copy of the book, a photograph is taken of the page and a printing block made from this. With a subtle blend of ink, carefully selected paper and artful printing by means of a nipping press a faithful facsimile will result. This is a highly skilled and expensive procedure. it is wise, if the facsimile is bound in, to acknowledge the sheet as a copy, noting the name and date on the inner fold.
An alternative is to bind in a blank leaf in the hope that it can be replaced in the future with a genuine sheet. Photocopies are not an option unless requested by the owner.
Pressing
When all repairs have been completed the sections are 'gathered' and thoroughly collated. Ideally the sections are knocked up to the head and spine, placed between pressing boards in the centre of a press. Pressing should continue for at least one week and the screw tightened every other day.. The result should be a solid text block with all the air excluded from between the sheets. This is the true measure of a book, making subsequent operations easier.
A number of books can be pressed at one time by placing larger volumes on the base and building up according to size. Each book has separate boards. Books are centred under the screw and it will assist if a piece of card the same size as the base plate is prepared with a number of lines drawn parallel to the edges and towards the centre.
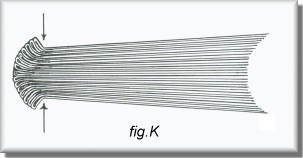 Failure
to press or weak pressure could result in compression in one place when the
book is backed. See fig.K Therefore the worker should not be satisfied
with amateur made or junior presses as their pressure is insufficient for the
work.
Failure
to press or weak pressure could result in compression in one place when the
book is backed. See fig.K Therefore the worker should not be satisfied
with amateur made or junior presses as their pressure is insufficient for the
work.
A difficulty is that sections tend to be thicker at the folds because of the swell caused by guarding and repair. In this instance the text is divided into groups and placed between boards, spines above foredges, until approximately the same thickness.
The foredges of photo albums and similar guarded books are half the thickness of the spines. These are packed with waste sheets until equal before pressing. Any hard surfaced boards can be utilised for pressing. Only one face is used against the book and this is kept smooth and clean.
Illustrated volumes must be studied. Some fresh from the printer, or unusually produced, may be sticky and cannot be pressed immediately although they can be initerleaved with a silicone paper. Some artistic engravings are embossed to create added interest and pressing would destroy the effect. The engravings should be removed and guarded in after pressing the remainder of the book.
Old books printed by hand presses on handmade paper are invariably distorted by cockling in the type area only. The heavy pressure of printing on damp paper spreads the fibres and this is impossible to remove by pressure.
Conclusion
Preparation is the first stage of the exciting and creative process of rebinding. The work is exacting but pleasurable and if executed efficiently the remaining operations should proceed without difficulty. There may be some anxiety over tile responsibility of caring for and rebinding books belonging to other people but that is the challenge of the craft.
Arthur W. Johnson - Arthur was born in 1920. As well as holding an Art Teacher's Diploma and a National Diploma in Design he is also an Honary Fellow of both the Institute of Craft Education and Designer Bookbinders. Arthur has held teaching posts at Hornsey College of Art, Hammersmith School of Art, Willesden College of Art and the London College of Printing. He retired from teaching several years ago. He has also lectured extensively in England, Canada and New Zealand. His work has included Calligraphy, Fine Binding and Antiquarian Book Restoration and his bindings can be found in many public and private collections, including the British Museum.
Skin Deep - Volume 17 - Spring 2004
Download Skin Deep - Volume 17 in PDF Format