

Volume 18 - Autumn 2004
Replacing the Leather on Leather Desks
by James Lane
Most leather inserts are small and easy to install. Below, I deliberately describe a difficult installation to show the depth and detail of how to do this kind of work.
1. The wooden surface must be clean and all imperfections and irregularities must be removed before the application of the leather. Using a scraper and sandpaper, 80 grit is fine to use, smooth the surface. All cracks and knot holes must be filled. Any and all imperfections will show through the leather, so you should not expect the leather to bridge any cavities.
2. Use a vacuum cleaner, compressed air, or broom to clean all dust and dirt off the back of the leather as well as the wood surface. Cleaning high spots off is very important as any 'mounds' will show through to the surface.
|
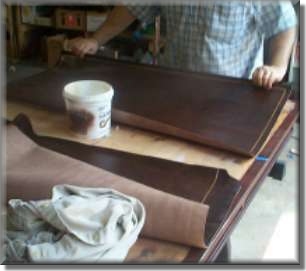
Sometimes the leather insert is larger than the area to be installed |
Slowly keep pushing and adjusting |
3. Using a clear strippable wallpaper paste as the adhesive for leather inserts has proven to be the best all around glue. The paste is water based so will not affect practically any finish, while providing good adhesion and enough working time to install and fit the insert. I recommend applying the paste with a plastic spreader that has a serrated edge. Of course you can use the original 18th and 19th century glue made from wheat paste. Please note, that as with any water based glue or paints, drying time may vary greatly according to the air temperature and humidity.
Important
Tip
Order a scrap of leather and test it out by gluing it on the desk to find
out the drying times.
i. Apply the adhesive to a clean area on the desk the same size as the scrap
of leather.
ii Apply the scrap of leather, position it and smooth it out with a roller
just as you would do applying the full size leather.
iii Let dry for 24 hours. In a cold environment, allow 48 hours.
iv Try to lift up a corner. This will indicate how long the drying times will
be.
v Pull off leather and clean surface with a scraper.
4. It is very important to lay the paste as evenly as possible. The thickness of the glue will change the drying times. It is important to take drying time into consideration because leather will shrink and expand in different environmental conditions. Most inserts will not fit perfectly on a table so a certain amount of time and effort is needed to make adjustments.
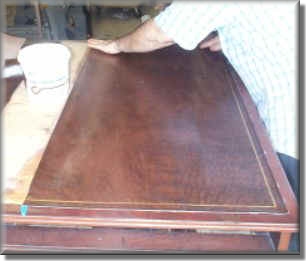
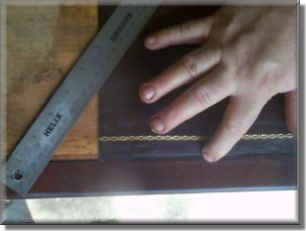
5. Sometimes the leather insert is larger than the area to be installed. In these cases you will need to centre the insert. The key point here is to centre the decorative edge emboss. In other words make sure the gold emboss is an equal distance from the edge on all four sides.
6. Now this is the part where you need the glue to dry slowly, to allow for proper positioning of the leather to the desk. There are no fixed rules here except the equal distancing the embossing to the edge.
7. Just slowly keep pushing and adjusting the leather to the right position.
8. If the leather is too large it will compress. In this photo I am pushing towards the middle of the desk. For every square foot, leather can be stretched or compressed approximately 0.25" (6mm).
9. Now that the insert is well fitted and positioned in the centre it is time to smooth out all of the bubbles and lumps
|
Smoothing out the bubbles & bumps |
Trimming the leather |
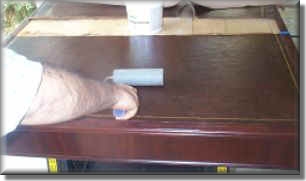
10. I have found that the best tool for getting a smooth surface is to use a plain old paint roller. Start from the centre and work out ward, pushing the bubbles out toward the outer edge. You will have to go over area many times to get a smooth surface. Watch out for lines formed by the roller's edge. Just go back over them with less weight on the roller.
11. After the insert has a smooth surface and all the bubbles have been removed you may need to do more positioning by stretching and compressing the insert. The excess leather will need to be trimmed off.
|
A little more adjusting |
Wipe off the glue |
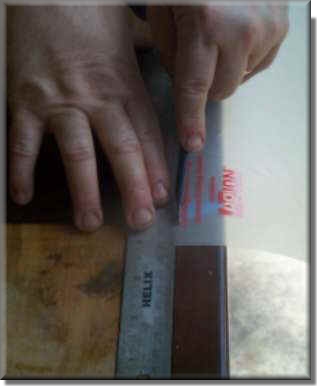
12. To trim the insert you will need to place a piece of cardboard or something similar between the wood and the insert to protect the wood surface. Now take a straight edge and line up to the wood border.
13. Take brand new blade and start trimming. Do not press down too hard on the cutting blade. It is better to go over two or three times than cut through the cardboard or pull the leather out of position.
14. A little more adjusting to get the perfect fit.
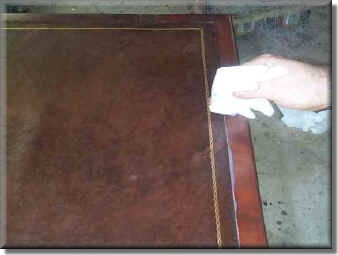
15. Now take a dry paper towel and wipe up the excess glue.
Important
Tip
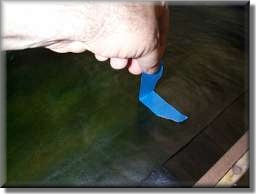
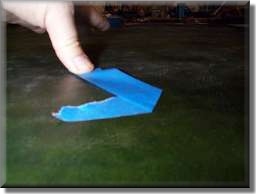
Sometimes you will have to tape down the edges. Use only masking tape, that
is a tape that has a very weak adhesive. Do not leave it on longer than 24
hours. To remove the tape never, ever pull straight up. Always pull close
to the surface and at a diagonal.
|
Incorrect |
Correct |
James Lane - James is an antique restorer based in Florida and runs the AntiqueResorers.com web site. This article is reproduced with his kind permission.
Skin Deep - Volume 18 - Autumn 2004
Download Skin Deep - Volume 18 in PDF Format