

Volume 16 - Autumn 2003
How to modify a Spokeshave.....
...... for Paring Leather
Over the years, we have sold numerous spokeshaves, but until relatively recently, had rarely been asked how a spokeshave should be modified for use before paring leather. So following numerous requests from customers, we decided to post a message to the Internet's Book Arts List requesting advice on this 'perplexing' question. We had a number of very helpful responses and have decided to put them together here to give what we believe is a concise and definitive description on 'How to Modify a Spokeshave for Paring Leather'. We gratefully acknowledge the contributions of Ken Brownlow, Don Drake, Rodney Fry, Mia Leijonstedt and Shelagh Smith without whose help this article would not have been written.
 Spokeshaves
were 'invented' by wheelwrights, as their name suggest, as a tool for hand shaping
the spokes on the wooden wheels of carriages and wagons. The modern spokeshave
hardly differs from those of days gone by. However, it will not work on leather
without some modification.
Spokeshaves
were 'invented' by wheelwrights, as their name suggest, as a tool for hand shaping
the spokes on the wooden wheels of carriages and wagons. The modern spokeshave
hardly differs from those of days gone by. However, it will not work on leather
without some modification.
There are two parts to the modification process, as both the blade and the spokeshave body will need to be altered. The following applies for the more common Stanley No.151 model, but the information provide is pertinent to all models of flat-based spokeshaves.
The Spokeshave Body
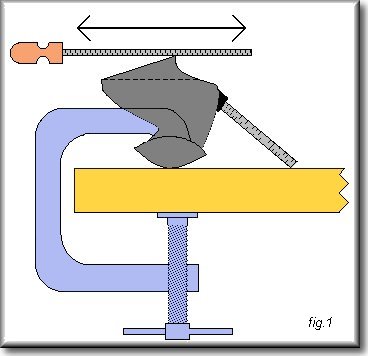
Disassemble the spokeshave and clamp upside-down to a bench clamp using two G-clamps. (see fig.1) The bottom surface of the body, i.e. the part that is now uppermost, needs to be filed flat and parallel to the bench. This may be done with a large, flat engineer's file and should give an angle to the blade of approximately 30º.
When bought, the slot aperture in the base of the spokeshave is too narrow and will need to be enlarged to prevent the leather shavings from clogging it up. The slot will need to be increased to about 5mm (3/16"), carefully filing away from the leading edge.
It is worth taking time finishing off these two process by smoothing grinding on a sharpening stone until the surface is shiny, a sign that the face is free of irregularities. If available, a diamond stone is preferred as it retains its flat shape for longer.
The Blade
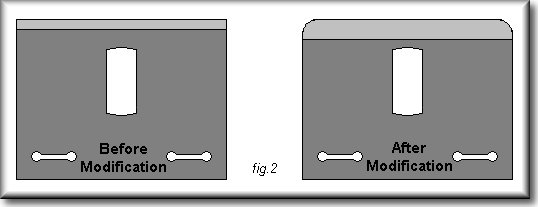
Since the metal on the steel blade is much harder than that on the cast iron body, a degree of patience will be required for the next step. The bevel edge on the blade is supplied with an angle of approximately 30º.
 The
bevel edge will needs to be ground down to a more acute angle of about 10º.
If you have a grinding machine, then the job will be relatively easy. If not,
then you will need to be patient and use a coarse stone. A way of judging this
angle is that when finished, the line from where the bevel starts will need
to be about 3mm (1/8") from the oblong hole of the blade. (see fig. 2)
The
bevel edge will needs to be ground down to a more acute angle of about 10º.
If you have a grinding machine, then the job will be relatively easy. If not,
then you will need to be patient and use a coarse stone. A way of judging this
angle is that when finished, the line from where the bevel starts will need
to be about 3mm (1/8") from the oblong hole of the blade. (see fig. 2)
The sharp corners of the blade will need to be rounded-off, to prevent them from snagging on the leather when paring. Each corner is slightly rounded for a length of about 6mm (1/4") so that the sides of the blade are not visible when looking along the bottom edge of the spokeshave.
Finally, the blade will need to be made very sharp. The final edged should be honed by using a fine Arkansas stone or a 5000 or 6000 grit stone.
Reassembling the Spokeshave
When reassembling the spokeshave, it is important to ensure that the blade is replaced in the correct way for leather paring; that is with the bevel side down, the opposite way in which you would expect to use a paring knife. Please note that this is also most probably the opposite way to which the spokeshave was supplied to you.
Use the adjusting screws to make the blade protrude just slightly from the bottom surface, and 'set' the blade so the paring is done by the centre of the spokeshave.
Skin Deep - Volume 16 - Autumn 2003
Download Skin Deep - Volume 16 in PDF Format