

Volume 16 - Autumn 2003
How to Make a Single-Section Binding
by John Pursey
Follow the 10 basic steps below, to produce a single section book or pamphlet
 1.
Choose a pamphlet or fold some plain (A4 or Legal) paper to the required size
and thickness (no more than 16 pages will give you the best results)
1.
Choose a pamphlet or fold some plain (A4 or Legal) paper to the required size
and thickness (no more than 16 pages will give you the best results)
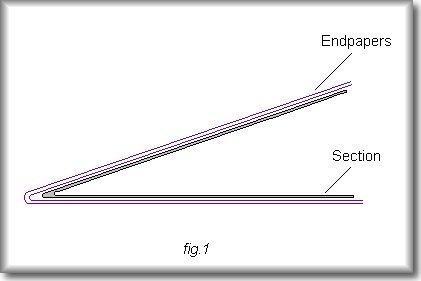
2. Select some coloured paper and fold it to produce some endpapers. You will need 2 pieces to wrap around the outside of your section. These need to be cut to the same size as the section. (see fig.1)
3. Take a piece of linen or mull, this will act as a reinforcement to the binding edge. The suggested size of this piece is 75mm wide by 25mm less than the length of your section. Fold this piece in half long ways and mark it. The next operation is to glue this piece to the outside of the endpapers around the spine. It is important that you do not use too much adhesive and that you keep your work space clean by throwing away all the waste paper you have glued out on.
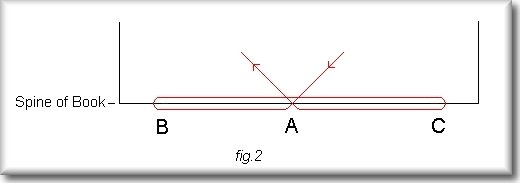 4.
The next step is to sew the book and to do this we will use three hole sewing.
Measure the length of your section and mark the middle faintly with a pencil
on the inside, then measure in 50mm from top and bottom and mark again. Thread
your needle with some sewing thread and starting from the inside push the needle
through the middle hole (A). Leave a tail of thread approximately 50mm long
and then enter via (B) along the inside and out through (C) and finally back
through the middle hole (A). Once you have done this pull the thread tight and
tie into a knot. (see fig.2)
4.
The next step is to sew the book and to do this we will use three hole sewing.
Measure the length of your section and mark the middle faintly with a pencil
on the inside, then measure in 50mm from top and bottom and mark again. Thread
your needle with some sewing thread and starting from the inside push the needle
through the middle hole (A). Leave a tail of thread approximately 50mm long
and then enter via (B) along the inside and out through (C) and finally back
through the middle hole (A). Once you have done this pull the thread tight and
tie into a knot. (see fig.2)
 5.
Trim section or pamphlet if necessary, by using a guillotine or a knife and
straight edge.
5.
Trim section or pamphlet if necessary, by using a guillotine or a knife and
straight edge.
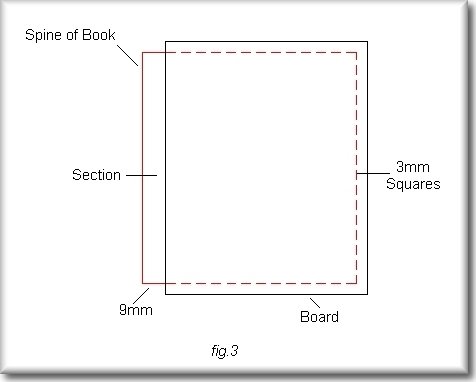
6. The next operation is to cut some greyboard for the front and back of the book. The grain direction should run from head to tail of these boards. They need to be 6mm longer than your book and 6mm less than the width so that when they are put over the section it gives you a standard 3mm overlap. (see fig.3) As you will see from this diagram, the boards are 9mm from the spine, this allows the book to open and close easily. It is also very important that these boards are cut accurately and are square.
7. You now need to make a template so that you can cut your cloth to the right size. We are going to have a full bound cover. Take a piece of clean waste paper and wrap it around your book and boards and add 20mm extra on each edge. When you have done this place the template onto the chosen cloth and cut the cloth out accurately.
 8.
Place the cloth onto a large piece of waste paper so that when you start to
glue the material you keep your bench clean. With a pencil mark the middle of
cloth and draw a line from top to bottom. You will use this line to position
your book to. The next step is to glue your material and this needs to be done
quickly and with an even spread of PVA. Always glue from the middle of the cloth,
by brushing away from you. Holding book and boards as in Diagram 3 place them
in position on the cloth with the spine along the line you have drawn. Make
sure you have equal margins all around the board. Press one board down and then
by holding that firmly in position bring the remaining cloth over, and press
it onto the top board. Lift cloth, boards and book off of waste paper in one
move and place in clean position. Throw waste paper away.
8.
Place the cloth onto a large piece of waste paper so that when you start to
glue the material you keep your bench clean. With a pencil mark the middle of
cloth and draw a line from top to bottom. You will use this line to position
your book to. The next step is to glue your material and this needs to be done
quickly and with an even spread of PVA. Always glue from the middle of the cloth,
by brushing away from you. Holding book and boards as in Diagram 3 place them
in position on the cloth with the spine along the line you have drawn. Make
sure you have equal margins all around the board. Press one board down and then
by holding that firmly in position bring the remaining cloth over, and press
it onto the top board. Lift cloth, boards and book off of waste paper in one
move and place in clean position. Throw waste paper away.
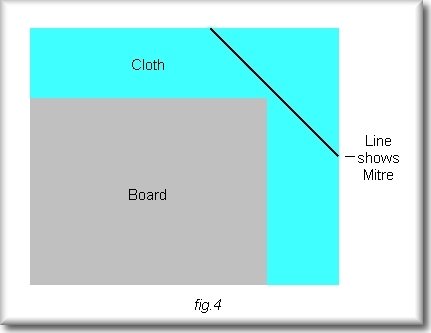
9. Remove the book from between the boards and open cloth back into a flat position. You must now mitre the corners and turn the cloth in. (See fig.4). When cutting the corners they should be a board thickness away from the corner of the board. This will give you a neat turn-in. Bring the cloth over on the long edges first and fold in any excess on corners and then turn-in the last two sides. If you find that the glue has started to dry apply a little bit more. The cover should now be pressed (flat) and allowed to dry.
10. The last stage is to case the book in. You will need 2 pieces of waste paper slightly larger than your book. Put the cover flat on the bench and place your book accurately in position on one of the boards ensuring that you have the 3mm square on three sides. Place one piece of waste between the 2 coloured endpapers and glue or paste the top sheet. Pull out the waste sheet and then by holding the book in position with one finger bring the cover over to come into contact with the endpaper. Turn the book over and then repeat the process on the other side. DO NOT OPEN THE BOOK. Put the book into a press between pressing boards and press. Leave your book under a light weight to allow it to dry. When the book is dry open it. If you were binding a pamphlet make sure you have cased in the book with the title pages at the front.
If you had wanted to title this project, the tooling could either have been done before or after casing-in.
Skin Deep - Volume 16 - Autumn 2003
Download Skin Deep - Volume 16 in PDF Format